- info@sec4good.cz
- V Olšinách 2300/75, 100 00 Praha 10

A couple of months ago we were asked to help with incident response after a ransomware attack that, among other things, encrypted several VMWare machines. Naturally, we wondered if the virtual machine disks could be recovered or at least some data extracted from them without paying a ransom.
The very first look at the disk file gave us hope that there was some chance of recovery. Apart from the .needhelp296 extension identifying the type of ransomware, the file name revealed that it was a so-called flat virtual disk. Unlike the sparse format of a virtual disk, the structure of a flat VMDK file is identical to that of a physical disk. The first byte of the file corresponds to the first byte of the disk, the second byte of the file to the second byte of the disk, and so on. Although VMWare may split the disk into several files, it shouldn’t be difficult to compose them back into a single file.
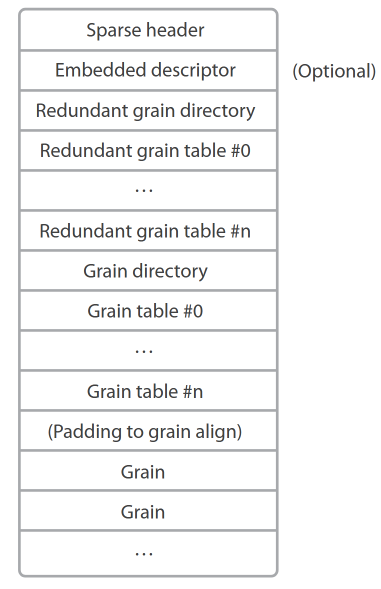
In contrast, sparse disks build a multi-level abstraction over the data in the form of grain tables and grain directories. If ransomware manages to overwrite these records, recovery can be very arduous. This VMDK format is becoming increasingly common as it allows for gradual disk expansion and removes the need for preallocating the whole disk during the creation of a virtual machine.
If you’re struggling to navigate all the different types of VMDK files, we recommend the now lost but fortunately archived Technical Note, which provides a great desription of their format. Another stepping stone can be the source code of QEMU, a open-source virtualization software, which supports VMDK.
Upon examining the file using a hexeditor, we found that the first 63 MB and the last 1.5 KB of the total 17 GB were encrypted. So there’s a chance that some data may be recoverable. It’s fairly common for ransomware to encrypt the beginning and the end of the disk. That’s because modern file systems, such as NTFS, often back up their control structures, which contain files’ metadata and much more, at the end of the disk. Thus, by encrypting the beginning and end of the disk, ransomware minimizes the chance of data recovery, while saving time that would be wasted by encrpyting the entire disk.
It’s always a good idea to go the easy route first. In our case, let’s try to boot the VMDK in VMWare or at least attach it to an existing virtual machine. According to the aforementioned VMDK specification, flat virtual disks actually consist of at least two files. The first one, the descriptor, specifies the structure of the virtual disk. VMWare uses this file, among other things, to understand the structure of virtual disks that consist of multiple files. Since the descriptor is usually a terse text file, ours was lost due to the ransomware attack; therefore, we have no choice but to create a new one.
The fastest way to get a valid descriptor is to have VMWare Workstation generate one. To achieve this, let’s create a virtual machine with a flat virtual disk with the required size, in our case 17 GB. We do this by checking “Allocate all disk space now” when creating the disk. Next, select “Store virtual disk as a single file” so that the created disk adheres to the format of the disk being recovered, which consists of a single file.
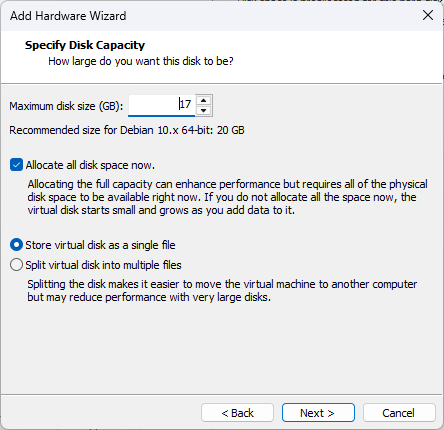
This will create the two previously mentioned files. The smaller one without the -flat suffix is the descriptor we needed. The larger file, the one with -flat in its name, is a disk data file that we can replace with the disk we are trying to recover. The last step is to modify the descriptor to match the structure of the disk being created. In our case, the exact size of the disk file was 18,253,612,564 bytes. The only complication here is that VMWare descriptors specify disk sizes in sectors. So to get the corresponding figure, we need to divide the size in bytes by 512, which gives us 35,651,587 sectors. The result can then be written under “Extent description“.
# Disk DescriptorFile
version=1
encoding="windows-1252"
CID=fffffffe
parentCID=ffffffff
createType="monolithicFlat"
# Extent description
RW 35651587 FLAT "disk-flat.vmdk" 0
# The Disk Data Base
#DDB
ddb.adapterType = "lsilogic"
ddb.geometry.cylinders = "2219"
ddb.geometry.heads = "255"
ddb.geometry.sectors = "63"
ddb.longContentID = "e1d45ffd15ed01ece0067056fffffffe"
ddb.uuid = "60 00 C2 96 44 80 3d cc-69 1f 81 99 dc f8 20 e2"
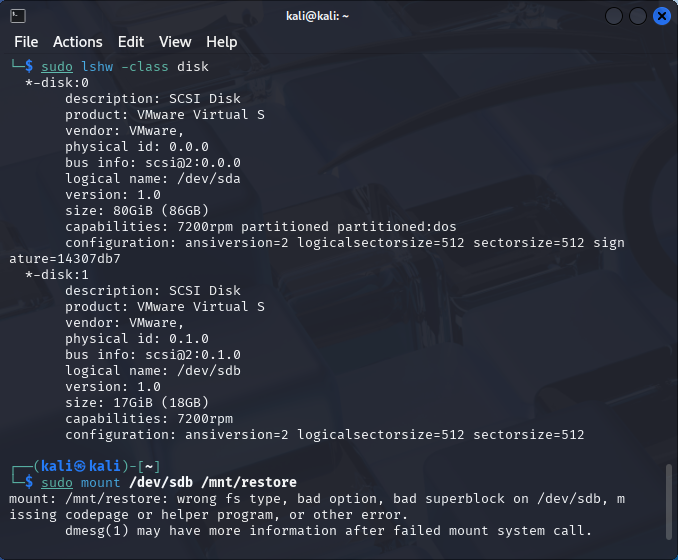
ddb.virtualHWVersion = "21"Now, let’s start the VM and try to access the disk. Using the lshw -class disk command, we can verify that the disk has indeed been attached. We can then try to mount it using the mount command. Unfortunately, the command fails with an error referring to an invalid superblock. This indicates that mount is trying to mount the disk as a partition and expects it to contain a valid file system. A superblock is a disk structure that contains information about the file system, such as its type, sector size, and more. It’s also worth noting that the operating system only created the /dev/sdb special file, which is used to access the disk as a whole, and the /dev/sdb1, /dev/sdb2, and other special files which usually represent the partitions are missing. The absence of these files indicates possible corruption of the partition table.
Let’s change our approach. Instead, we’ll scan the disk for partition headers and reconstruct the partition table. From here on out, we can either use the virtual machine, which we’ve previously created and attached the disk to, or if you want to skip the analysis (which you totally can) and proceed straight to data recovery without ever touching VMDK desciptors, we can use a virtual loop device, that’s going to help us access the VMDK file as a disk. Then, we’ll open the resulting special file using testdisk.
sudo losetup loop0 disk.vmdk
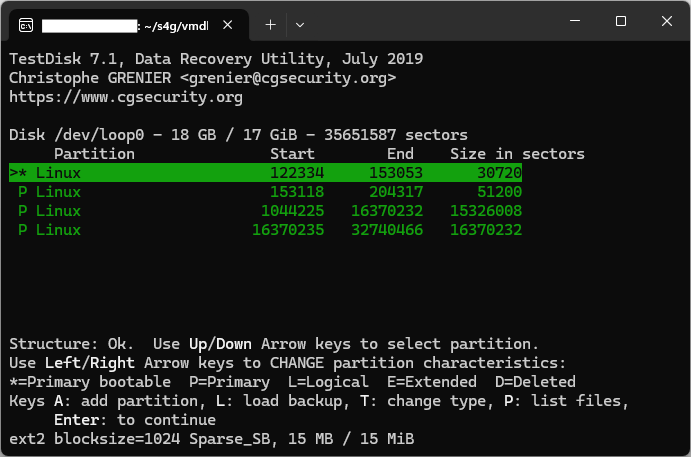
sudo testdisk /dev/loop0This tool is tailored exactly for our use-case. It searches for partitions present on the disk, determines their type, and reconstructs the partition table. When deciding which parameters to use with testdisk, we need to base our decisions on the knowledge of the disk we are restoring, such as whether it uses an MBR or GUID partition table, roughly what partitions we can expect, or whether virtual machine was running Windows (often NTFS) or Linux (often ext).
When testdisk finishes its search, it displays a table presenting the discovered partitions. Here we can modify the characteristics of each partition (e.g. whether it is bootable), or view the files stored therein. This functionality can be used to get rid of false positive findings. In our case, however, all partitions are valid, so we’ll confirm the selection by pressing Enter. On the next screen we choose “Write” to save the partition table. Additionally, “Deeper Search” may be used to perform a more detailed analysis of the file. While having a higher chance of finding lost partitions, it also comes with its cons, such as longer execution time or a bigger risk of false positives.
If you opted for the approach based on loop devices, we’ll now have to create special files for each of the recovered partitions. If you chose to stick with the virtual machine, it should be enough to reboot it and the bindings should be created automatically.
sudo kpartx -av /dev/loop0The command creates the /dev/mapper/loop0p1, /dev/mapper/loop0p2 and other special files, each of which corresponds to a single partition. Prior to mounting the partitions, we can use fsck to check their integrity.
sudo fsck /dev/mapper/loop0p1
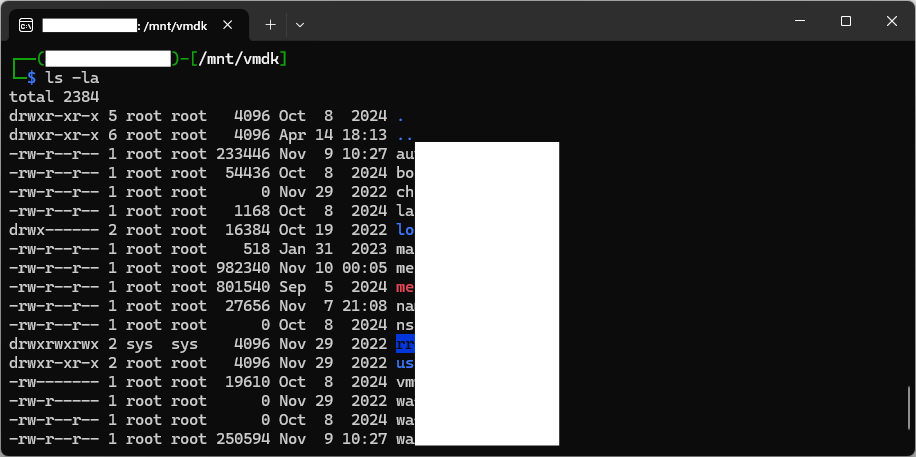
sudo mount -o ro /dev/mapper/loop0p1 /mnt/vmdkIf all goes well, the partition will be mounted an we’ll be able to access its files. The quality of the results will depend on how much of the disk was encrypted and whether the restored partition table is correct. If mount fails, it may indicate that the partition is corrupted or that the partition table isn’t correct.
Not exactly. Although we were able to reproduce these steps for several different VMDK files encrypted by the same ransomware, there’s no guarantee they’ll work for any encrypted disk. While it’s handy to remember that some files can be restored without paying a ransom, our case was made easier by a stroke of luck. Only about 64 MB of the 17 GB disk was encrypted (that’s just 0.38%) and the VMDK was flat. Keep in mind, that threat actors are aware of this and often exfiltrate your data as well as encrypt it and then threaten to make it public.
Although we have shown that a ransomware attack doesn’t necessarily result in data loss, we argue that regular backups are a much more efficient and reliable solution. If you consider your virtual machines important enough to spend several hours rummaging through encrypted files, you should consider backing them up regularly.